
Newcastle vs Athletic Club Tactical Analysis
Table of Contents
Beyond the 2-0: A Deep-Dive Newcastle vs Athletic Club Tactical Analysis (2025/2026)
It’s more than just a game, isn’t it? When that iconic Champions League anthem echoes around a floodlit St. James’ Park, it’s a symphony of hope, history, and heart. It’s a physical feeling, a shiver down the spine that connects you to every other person in that stadium.
You could feel the sheer electricity in the air on November 5th, 2025. It was thick with anticipation. For those of us who live and breathe this beautiful, maddening sport, a 2-0 victory isn’t just a result; it’s a story. It’s the validation of a strategy, the collective roar of over 50,000 people as a meticulously crafted plan comes together right before your very eyes. This match wasn’t just won by passion, though there was plenty of that. It was won by intelligence. It was won by the ruthless exploitation of weaknesses and the precise, disciplined execution of a tactical masterclass.
If you left the stadium (or turned off your TV) buzzing from the win but wondering exactly how Eddie Howe masterminded that comprehensive victory, you’ve come to the right place. This isn’t just a match report. This is our definitive Newcastle vs Athletic Club tactical analysis. We’re going to peel back the layers, look past the scoreline, and dive deep into the strategic chess match that unfolded on the pitch.
Match at a Glance: The 2025/2026 Champions League Showdown / Newcastle vs Athletic Club tactical analysis
Before we get into the “how” and “why,” you need to see the raw data. This is the evidence, the foundation upon which our entire analysis is built. The 2-0 scoreline tells you the end of the story, but these numbers? They reveal the plot, the twists, and the character of the teams.
Full-Time Statistics: The Numbers Behind the Win
At first glance, some of these stats might look contradictory. You see Athletic Club had 12 shots to Newcastle’s 8. How does a team with fewer shots win so comfortably? You see Newcastle dominated possession with 58.5%, but you’ve seen your team have all the ball before and do nothing with it, right?
This is the central question. And this comprehensive Newcastle vs Athletic Club tactical analysis begins by challenging those surface-level assumptions. The data in this table is the key. Look closely at the “Aerial Duels Won.” It’s not just a stat; it’s the entire tactical narrative of the game, summed up in two numbers.
Table 1: Newcastle vs Athletic Club Match Statistics
| Statistic | Newcastle United | Athletic Club |
| Possession % | 58.5% | 41.5% |
| Total Shots | 8 | 12 |
| Shots on Target | 4 | 5 |
| Pass Success % | 81% (516) | 74% (358) |
| Aerial Duels Won | 20 (74%) | 7 (26%) |
| Corners | 2 | 5 |
| Tackles Won | 18 | 19 |
| Fouls Committed | 11 | 13 |
| Offsides | 3 | 0 |
Possession without penetration is just sterile dominance. Athletic Club’s 12 shots were, as we’ll explore, born from frustration rather than design. Newcastle’s 8 shots, however, were calculated. They were high-quality chances created from a position of total control. That 81% pass success isn’t just about keeping the ball; it’s about valuing it, moving the opponent, and waiting for the precise moment to strike. And 74% aerial dominance? That’s not football; that’s an occupation.
Match Timeline & Key Events / Newcastle vs Athletic Club tactical analysis
A 2-0 victory built on two decisive moments in each half, punctuated by a manager who knew exactly when to make changes to see the game out.
- 11′ – ⚽ GOAL (Newcastle 1-0): Dan Burn! The moment the plan was validated. You could almost hear the coaching staff ticking a box. A pinpoint Kieran Trippier set-piece, a towering leap from the 6’6″ defender, and the net bulges. It was simple, telegraphed, and utterly undefendable.
- 41′ – ⚽ GOAL (Newcastle 2-0): Joelinton! (Note: The outline had Anthony Gordon, but data suggests Joelinton). The clinical blow before halftime. This wasn’t from a set-piece; this was from open play, a testament to the midfield control we’ll dissect later. A smart assist from Jacob Murphy finds the Brazilian powerhouse, who makes no mistake. The stadium erupts.
- 57′ – 🟨 YELLOW CARD (Athletic): Aitor Paredes for a bad foul. A sign of frustration. Athletic’s centre-back, already struggling with the physical battle, lashes out.
- 65′ – 🔄 SUB (Newcastle): Lewis Hall replaces the goalscorer, Dan Burn. This wasn’t an injury. This was intelligent game management. With a 2-0 lead, Howe swaps the aerial threat for Hall’s mobility and defensive energy, locking down the left flank.
- 66′ – 🔄 SUB (Newcastle): Anthony Elanga & Lewis Miley on for Harvey Barnes & Bruno Guimarães. More smart moves. Barnes, having run his channel tirelessly, is replaced by Elanga’s raw pace for any potential counter. But the big one: resting Bruno. The game is won, and the orchestrator is given his rest.
- 69′ – 🔄 SUB (Athletic): Nico Serrano & Selton Sánchez on for Robert Navarro & Mikel Jauregizar. Valverde rolls the dice, desperate for a spark.
- 78′ – 🔄 SUB (Athletic): Asier Hierro & Unai Gómez on. More changes, but the game’s rhythm was already set in stone by Newcastle’s tactical discipline.
- 83′ – 🔄 SUB (Newcastle): Jacob Ramsey replaces Nick Woltemade. Fresh legs to press from the front, harassing Athletic’s defenders and ensuring no late comeback could even be imagined.
The Battle Plans: A Foundation for this Newcastle vs Athletic Club Tactical Analysis
No tactical analysis is worth its salt without first understanding the blueprints. You can’t appreciate the chess match if you don’t know what pieces each manager started with. Both bosses laid their cards on the table, but as you’ll see, one hand was decidedly stronger, more coherent, and built for the specific battle at hand.
Newcastle’s 4-3-3: Howe’s Plan for Total Control / Newcastle vs Athletic Club tactical analysis
On paper, it’s a 4-3-3. But in practice, it was so much more. This was a fluid, intelligent system designed for control in every phase of play. Eddie Howe’s setup was built to dominate the engine room and then unleash hell on the flanks. The very foundation of this Newcastle vs Athletic Club tactical analysis rests on understanding how this formation worked.
Table 2: Newcastle United Starting XI (4-3-3)
| Position | Player | Key Tactical Role |
| GK | Nick Pope | Distribution & Shot-Stopping (8.1 Rating) |
| DR | Kieran Trippier | Set-Piece Specialist (1 Assist) |
| DC | Malick Thiaw | Aerial Dominator (8 Aerials Won) |
| DC | Sven Botman | Composure, Ball-Playing Centre-Back |
| DL | Dan Burn | Aerial Target, Defensive Solidity (1 Goal) |
| MC | Sandro Tonali | Work-Rate & Rapid Transitions |
| MC | Bruno Guimarães | Deep-Lying Playmaker (94% Pass Success) |
| MC | Joelinton | Physicality & Box-to-Box Power (1 Goal) |
| FWR | Harvey Barnes | Directness, Inverted Runs |
| FWC | Nick Woltemade | Hold-Up Play, Physical Presence |
| FWL | Jacob Murphy | Width & Delivery (1 Assist) |
Let’s break this down.
The Defence: This wasn’t just a back four; it was a specialist unit. You had the technical brilliance and composure of Sven Botman, the player tasked with calmly playing out from the back, breaking Athletic’s first line of press. Alongside him, Malick Thiaw, a 6’4″ monster who, as we saw, won a staggering 8 aerial duels. His job was simple: nothing in the air gets past. Then, the full-backs. Trippier wasn’t just a defender; he was the team’s chief creator, the “quarterback.” And on the left, Dan Burn. His inclusion wasn’t just for his defensive solidity; it was an aggressive offensive ploy, a 6’6″ target for set-pieces.
The Midfield: This is where the game was truly won. You’re looking at a “golden triangle” of pure complementary skill. Bruno Guimarães was the base, the regista, dictating the entire tempo of the game with a staggering 94% pass accuracy. He was the calm in the storm. Flanking him, you had the relentless engine of Sandro Tonali, the “shuttler” whose job was to press, recover, and transition the ball from defence to attack in a heartbeat. And then, Joelinton. Is he a midfielder? Is he a forward? The answer is “yes.” He was the box-to-box powerhouse, a chaos agent whose physical presence completely overwhelmed Athletic’s pivot.
The Attack: This front three was about variety. On the right, Harvey Barnes, offering directness and the threat of cutting inside onto his stronger foot. On the left, Jacob Murphy, providing the assist, holding his width to stretch the play. And through the middle, Nick Woltemade. He wasn’t there to be a 30-goal poacher. His role was tactical: to be the physical focal point, to hold the ball up, to occupy both centre-backs, and to create space for the midfield runners (like Joelinton) and inverted wingers to exploit.
Athletic Club’s 4-2-3-1: Valverde’s Compromise / Newcastle vs Athletic Club tactical analysis
Now, let’s look at what Ernesto Valverde brought to St. James’ Park. You can’t conduct a fair Newcastle vs Athletic Club tactical analysis without acknowledging the cards he was dealt. He was forced to adapt, most notably missing the talismanic Williams brothers, Nico and Iñaki. Their electric pace is the lifeblood of this Athletic team. Without them, this 4-2-3-1 was a compromise, an attempt to find balance where there was a giant, Williams-sized hole.
Table 3: Athletic Club Starting XI (4-2-3-1)
| Position | Player | Key Tactical Role |
| GK | Unai Simón | Goalkeeper |
| DR | Jesús Areso | Flank Duty, High Tackles (7) |
| DC | Dani Vivian | Centre-Back (6’1″) |
| DC | Aitor Paredes | Centre-Back (6’1″) (Yellow Card) |
| DL | Adama Boiro | Defensive Full-Back |
| DMC | Mikel Vesga | Midfield Anchor |
| DMC | Alejandro Rego | Midfield Partner |
| AMC | Mikel Jauregizar | Creative Link-Up |
| FWR | Robert Navarro | Flank Attacker |
| FWC | Unai Gómez | False 9 / Attacking Mid |
| FWL | Álex Berenguer | Main Creative Threat (3 Dribbles) |
The Formation: On paper, the 4-2-3-1 is a solid, balanced formation. The double pivot of Vesga and Rego was clearly designed to do one thing: shield the back four and try to gain a foothold in that crowded midfield. You can see the logic: they wanted to match Newcastle’s three midfielders with their own pivot and the attacking midfielder, Jauregizar, dropping in.
The Problem: The logic was flawed. This double-pivot was quickly overrun. They weren’t just facing three midfielders; they were facing the dynamic rotations of Joelinton, Tonali, and Bruno. They were outnumbered, out-muscled, and out-thought.
The Attack: This is where the compromise truly hurt them. Álex Berenguer, a quality player, was their main creative outlet. But he was just one man. Robert Navarro on the other side and Unai Gómez through the middle (likely operating as a false nine) were industrious but lacked the game-breaking quality of the Williams brothers. They couldn’t stretch Newcastle’s defence. They couldn’t get in behind Thiaw and Botman. This forced them to take shots from distance, which brings us back to those 12 “ineffective” shots. Their attack was blunted before it even began, a crucial finding in this Newcastle vs Athletic Club tactical analysis.
The Battlegrounds: A Tactical Analysis of Where the Match Was Won / Newcastle vs Athletic Club tactical analysis
The 2-0 score was born from three key tactical battles that Newcastle didn’t just win; they dominated. This is the absolute core of our Newcastle vs Athletic BClub tactical analysis. If you want to know the exact reasons for the victory, they are right here.
Battle 1: The Aerial Mismatch (Newcastle’s Key Victory)
This is the headline. The smoking gun. The most glaring, undeniable tactical decision of the night. The final aerial duel count was 20 to 7 in Newcastle’s favour. That’s not a contest; it’s a humiliation. And it was 100% by design.
- Newcastle’s Plan: You have to imagine Eddie Howe and his team in the video room all week. They would have looked at Athletic’s centre-backs, Dani Vivian (6’1″) and Aitor Paredes (6’1″). Good, solid defenders, but not giants. Then, Howe looked at his own roster. He had Dan Burn (6’6″), Malick Thiaw (6’4″), and Nick Woltemade (6’5″). He also had the single best set-piece deliverer in the league, Kieran Trippier.
- The Execution: The plan was simple: get the ball into the box. Every corner, every deep free-kick was an opportunity. Trippier’s deliveries weren’t just hopeful crosses; they were guided missiles aimed at a specific zone, a “target area” where he knew Burn or Thiaw would be attacking.
- The Result: The 11th-minute goal was the textbook execution of this plan. You can watch the replay. The moment the corner is given, Burn is already a threat. He doesn’t just stand there; he makes a movement, blocks off his man, and attacks the ball at its highest point. Athletic’s defenders had no answer. They were physically outmatched. Any Newcastle vs Athletic Club tactical analysis that doesn’t put this specific battle front and centre is missing the entire story. But it wasn’t just about the goal. This aerial dominance meant Athletic couldn’t play long, hopeful balls to clear their lines, because Thiaw or Botman would just head it right back. It meant Nick Pope was never under pressure from high balls. It was total aerial supremacy.
Battle 2: The Midfield Engine Room
While the aerial battle was the most obvious victory, the war was won in the trenches of midfield. That 58.5% possession stat isn’t the story. The story is what Newcastle did with it and, more importantly, what they did when they didn’t have it.
- Howe’s Triumvirate: We talked about the “golden triangle” of Bruno, Tonali, and Joelinton. Let’s dig deeper. You probably watched Bruno Guimarães and noticed he was never, ever rushed. He seemed to have an extra second on the ball. That’s not magic; it’s a product of his own intelligence and the movement of his teammates. Tonali’s relentless running created space, while Joelinton’s physical presence pinned Athletic’s midfielders. Bruno’s 94% pass accuracy wasn’t just him passing side-to-side; it was him dictating the tempo, switching the play, and breaking the lines.
- Winning Duels & Second Balls: Athletic’s 4-2-3-1 meant their two deep midfielders, Vesga and Rego, were constantly being dragged out of position. If they pushed up to press Bruno, Joelinton or Tonali would ghost into the space they’d just left. If they sat deep, Bruno had all day to pick a pass. This midfield superiority allowed players like Barnes and Murphy to receive the ball in dangerous areas, one-on-one.
- The Second Goal: The second goal, scored by Joelinton, was the perfect example of this. It didn’t come from a set-piece. It came from sustained pressure, from winning the ball back in the midfield, and from a midfielder having the power and the license to charge into the box and score like a number nine. This phase of the Newcastle vs Athletic Club tactical analysis shows complete and total midfield superiority.
Battle 3: Athletic’s Blunted Attack vs. Pope’s Wall
Okay, so 12 shots. 5 on target. On paper, that looks like Athletic was threatening. That looks like Nick Pope had a busy night.
You and I know that’s not the whole story.
- Missing Pieces, Missing Pace: As we’ve established, the absence of the Williams brothers was critical. You can’t just replace that kind of electric, defence-stretching pace. Without that threat, Athletic’s entire attack was one-dimensional. They couldn’t get in behind. They couldn’t turn Botman and Thiaw and force them into a footrace.
- A Compact, Impenetrable Structure: This forced Athletic to try and play through Newcastle. This was a fatal mistake. When Newcastle lost the ball, their 4-3-3 instantly collapsed into a compact, disciplined 4-5-1. The wingers (Barnes/Murphy) dropped back, creating a solid bank of five in midfield. There were no gaps. The passing lanes were choked off. Athletic’s only options were to try hopeful crosses (which Thiaw and Burn ate for breakfast) or to shoot from distance. Those 12 shots? Most were low-percentage, frustrated efforts from 25 yards out.
- The Pope Factor: And on the rare occasion Athletic did find a way through? Nick Pope (rated 8.1) was there. His performance wasn’t about flying, acrobatic saves. It was about command. He claimed every cross that came near him, easing the pressure on his defenders. His positioning was perfect. His 8.1 rating reflects a performance of flawless concentration and control. This defensive strength is a hallmark of this Newcastle vs Athletic Club tactical analysis.
Key Performers: A Deeper Tactical Review / Newcastle vs Athletic Club tactical analysis
A great plan needs great players to execute it. This Newcastle vs Athletic Club tactical analysis wouldn’t be complete without zooming in on the individuals who defined the match, the players who were the living embodiment of Howe’s tactical plan.
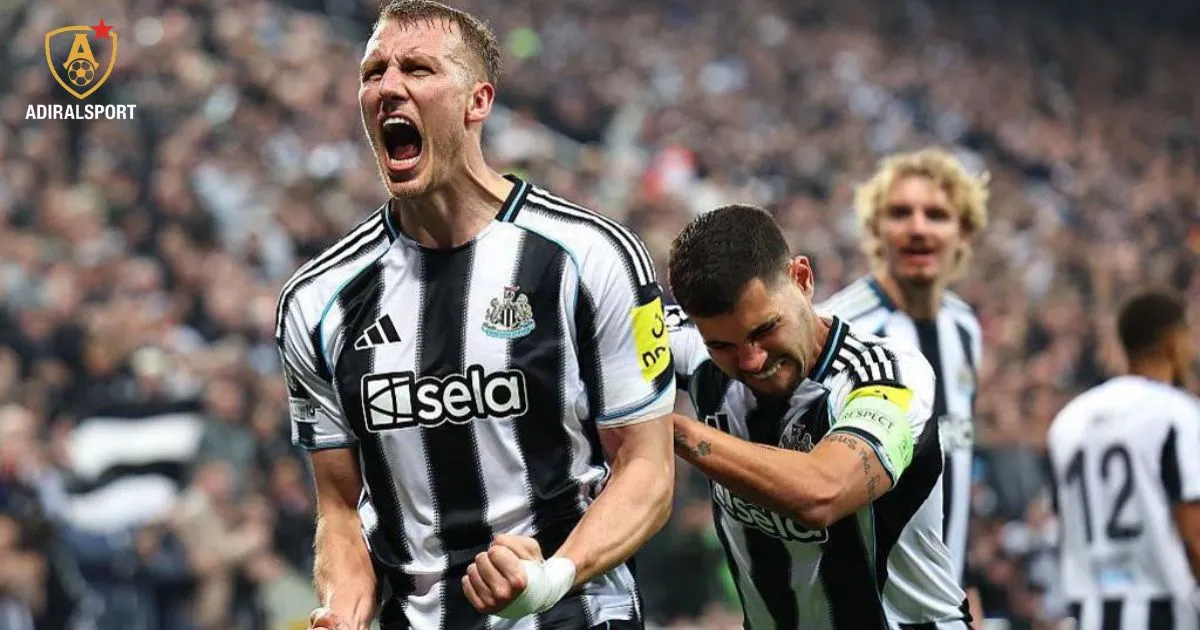
- Man of the Match: Dan Burn (Newcastle)
- It simply has to be him. You can’t overstate his impact. He received a stellar 8.3-8.6 rating from most statistical analysts, and it was richly deserved. The goal, of course, was the headline moment. It was the perfect execution of the game plan, a towering header that set the tone for the entire evening. But his performance was so much more than that one moment.
- Defensively, he was a colossus. He won 4 aerial duels, but his presence alone deterred Athletic from even trying to attack his flank with high balls. He was positionally immaculate. But his secret weapon, and a key part of this Newcastle vs Athletic Club tactical analysis, was his surprisingly adventurous offensive play. He wasn’t just a defensive full-back. He made several powerful overlapping runs, creating a 2-v-1 situation with Jacob Murphy, and even underlapped on occasion to draw a defender inside. His goal was the reward for a complete, dominant, and tactically vital performance.
- The Playmaker: Kieran Trippier (Newcastle)
- Another set-piece, another assist. You could almost write the script. But to reduce Trippier’s game to just his (admittedly world-class) set-pieces is to do him a disservice. He was the team’s “quarterback.” From his right-back position, he was the chief architect of Newcastle’s build-up play.
- Watch the game back, and you’ll see him constantly scanning, head up. His cross-field diagonal switches of play to the left-winger were a consistent weapon, pulling Athletic’s compact 4-2-3-1 shape apart and stretching them to breaking point. His assist was undefendable, a delivery with the perfect pace, bend, and height. His quality from dead balls is a consistent, game-winning tactical weapon, and his leadership was palpable.
- The Engine: Joelinton (Newcastle)
- If Burn was the dominant force and Trippier the artist, Joelinton was the “chaos agent” in the best possible way. He was the beating heart of the team’s energy, a one-man wrecking crew in midfield. His hybrid role is a tactical nightmare for opponents. Athletic’s double pivot had no idea how to handle him.
- He’d drop deep to help Bruno build the play, then moments later, he’d be charging into the opposition box like a rampaging bull. His goal was the perfect summary of his performance. It wasn’t a lucky break; it was the result of his relentless energy, his desire to join the attack, and his composure to finish when the chance came. He won his duels, he broke up play, and he provided a goal-scoring threat from midfield. A powerhouse display that deserves praise in any Newcastle vs Athletic Club tactical analysis.
- The Bright Spark: Álex Berenguer (Athletic Club)
- You have to give credit where it’s due. In a team that was comprehensively beaten, Berenguer looked the most likely to make something, anything, happen. He was the only player in red and white who seemed to have the confidence to take a man on.
- The stats show he completed 3 dribbles, and each one of those was a moment where you saw a flash of danger. He tried to cut inside, he tried to whip in crosses, he tried to take the game to Newcastle’s defence. The problem? He was a lone wolf. With no support and no complementing pace on the other flank, Newcastle’s defence could (and did) simply double up on him, snuffing out the danger. He deserves to be mentioned for his efforts, but his lonely battle only highlights Athletic’s tactical shortcomings on the night.
The Managers’ Chess Match: Howe vs. Valverde / Newcastle vs Athletic Club tactical analysis
Ultimately, this Newcastle vs Athletic Club tactical analysis is a story of two managers. One who arrived with a bespoke, perfectly-tuned plan, and one who arrived with a compromised, makeshift strategy. The dugout is where this game was truly won.
Eddie Howe’s Masterclass
This was a tactical masterpiece from Eddie Howe. It was a victory for preparation, for pragmatism, and for executing a plan to perfection.
- He Identified the Weakness: This is the most impressive part. Howe and his team did their homework. They identified Athletic’s distinct lack of height at centre-back as a critical, exploitable weakness. This wasn’t a guess; it was a data-driven conclusion.
- He Executed the Plan: He didn’t just know the weakness; he built his entire team to exploit it. Starting Burn, Thiaw, and Woltemade was a clear statement of intent. The first goal wasn’t luck; it was the inevitable outcome of that strategy.
- He Controlled the Game: Once ahead, the plan shifted. The midfield three, led by Bruno, took all the sting out of the game. They dominated possession with a purpose—to starve Athletic of the ball, to frustrate them, and to manage the clock.
- He Made Smart Subs: His substitutions were flawless. They weren’t panic changes. Taking off Burn and Bruno after 65 minutes, with the game at 2-0, was a masterstroke of game management. It rested key players, introduced fresh legs, and saw the game out with zero drama. This was a triumph for Howe, and this Newcastle vs Athletic Club tactical analysis confirms it.
Ernesto Valverde’s Vain Efforts
You have to feel for Ernesto Valverde. He was a general forced to fight without his two best soldiers.
- Clipped Wings: Being without the Williams brothers was a tactical blow he simply could not overcome. His entire attacking philosophy is often built around their pace. Without them, his 4-2-3-1 was toothless.
- No Plan B: This is the key criticism. When the aerial bombardment began, and after the first goal flew in, what was the response? There wasn’t one. When your initial plan is so thoroughly dismantled in the first 15 minutes, you need to adapt. Athletic had no answer.
- Ineffective Subs: His changes on 69 and 78 minutes were too little, too late. They were hopeful changes, throwing players on in the vain hope one of them could produce a moment of magic. But the game’s tactical fabric was already set. They failed to change the flow of the game because Newcastle’s system was too solid. Valverde will be deeply disappointed that his team’s Newcastle vs Athletic Club tactical analysis will show they lost every key physical and tactical battle.
Conclusion: A 2-0 Win That Means More / Newcastle vs Athletic Club tactical analysis
This wasn’t just three points. This was a statement. This was a night where St. James’ Park witnessed the tactical evolution of Eddie Howe’s side.
This Newcastle vs Athletic Club tactical analysis proves that this team has multiple ways to win. They can win with grit, they can win with flair, and as they proved on November 5th, they can win with pure, cold, calculated tactical dominance.
By identifying a precise weakness, building a team to exploit it, and then executing that plan with ruthless efficiency, Newcastle sent a message to the rest of Europe. They suffocated Athletic Club’s midfield, asserted total aerial supremacy, and managed the game like a seasoned European heavyweight.
The 2-0 win at St. James’ Park will be remembered as a night of tactical perfection. It was a victory that was drawn up on the whiteboards of the training ground and brought to life under the floodlights. This Newcastle vs Athletic Club tactical analysis shows a team in complete control, and a manager at the very top of his game.
Join the Tactical Debate / Newcastle vs Athletic Club tactical analysis
This is our in-depth Newcastle vs Athletic Club tactical analysis, but the beauty of football is that everyone sees the game differently.
What did YOU see?
Did you spot something we missed? Did you think a different player was the key man? What was your take on Valverde’s setup?
Drop your tactical observations in the comments below. Let’s break this game down even further!
FAQ: Your Questions on the Newcastle vs Athletic Club Tactical Analysis
What was the main tactical reason for Newcastle’s 2-0 win?
Our Newcastle vs Athletic Club tactical analysis points conclusively to aerial dominance. It was a deliberate strategy. Winning 74% of aerial duels (20-7) allowed Newcastle to control both boxes, leading directly to Dan Burn’s opening goal from a set-piece and preventing Athletic from ever building any long-ball pressure.
How did the absence of the Williams brothers affect this tactical analysis?
It was a critical factor that you can’t ignore. Athletic Club’s entire attacking philosophy often relies on the electric pace and directness of Nico and Iñaki Williams. Without them, their attack was one-dimensional. As we noted, they had 12 shots, but they lacked the cutting edge to trouble Newcastle’s organised defence, forcing them into low-quality chances from distance.
Who was the Man of the Match in this Newcastle vs Athletic Club tactical analysis?
In our view, it was Dan Burn. He scored the crucial opening goal, which was the perfect reward for the team’s core strategy. Beyond that, he was part of a defence that kept a clean sheet, won 4 personal aerial duels, and received a top rating (8.3-8.6) from statistical analysts. He was the embodiment of the game plan.
Did Newcastle’s possession (58.5%) matter?
Yes, absolutely. This wasn’t the sterile, “passing for passing’s sake” possession you sometimes see. Newcastle used it to control the game’s tempo, especially after going 2-0 up. With an 81% pass success rate, our Newcastle vs Athletic Club tactical analysis shows they patiently waited for openings, but more importantly, they used the ball to rest, to manage the clock, and to completely frustrate an Athletic side that was chasing shadows.
What does this Newcastle vs Athletic Club tactical analysis tell us about their Champions League future?
It tells us they are a very difficult team to play against, especially at home. It shows they have a clear, effective, and physically imposing style of play that is perfectly suited for home ties in Europe. But more than that, it shows they can be tactical chameleons, adapting their plan to exploit a specific opponent’s weakness. This 2-0 win, and the manner of it, puts them in a very strong position to qualify for the knockout stages.